
OpenID Connect: A Primer for Hackathons and App-Makers
The social factor has become an important dimension in how many web and mobile apps work today. Everything from providing a basic profile for a user to connecting with social media accounts requires some form of authentication. Unfortunately, if you’ve never worked with authentication systems, they can be a tad overwhelming and complex.
Fortunately, there are several frameworks and libraries built for you already that have this functionality built-in. If that’s all you looking for, here they are. If you want to know how the authentication works, however, read on!
So What is OpenID?
OpenID is a identity standard on top of the OAuth 2.0 standard. OAuth provides two key components to your web applications: authentication and authorization (sometimes abbreviated as AuthN and AuthZ respectively). Authentication proves who you are, authorization proves what you’re allowed to access. For example, if you’re writing a mobile game, you will need both since you need to know who the player is and what parts of the app they can access. A random player should only be able to access parts related to the game whereas an admin should be given access to a more privileged set of features (like a banhammer).
The problem is that creating a secure authentication and authorization framework requires a lot of developer hours and lots of auditing to make sure that nobody can sneak through. OAuth is a open standard that enforces these with several libraries that implement it for you.
How does it work?
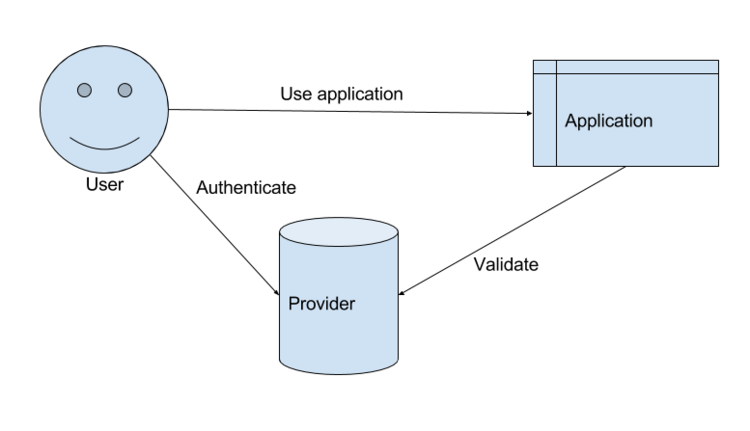
There are three parties to consider in an OpenID request: the user, the application, and the identity provider. When a user connects to your application, it presents a token (usually a cookie) that identifies itself. The application can present this token to the identity provider (or use some information given by the provider) to make an authentication decision.
Given this layout, there are three states this relationship can be in: a “cold” state (i.e. the user has never used the application before), an authenticating state, and an authenticated state.
Cold State
Suppose a user has never used the application before, they now connect for the first time to your fancy new app (fancy.io). Now you made fancy.io always require the user to be in an authenticated state, so upon seeing that they have presented no credentials, you need to make the call to authenticate them. Suppose that our identity provider in this case is Google. Google will provide you a URL to redirect the user to go through the authentication process. Before fancy.io presents this URL to the user, it adds information like the app information and details on what type of information it wants. So after you assemble this URL, you redirect the user (that’s a 302 for you HTTP nerds) to Google’s authentication URL.
When the user gets connected to Google, they’ll be asked to log into their Google account and usually will be asked to give permissions to your app. Once the user has logged in and consented to use your application, they are provided two pieces of information: an authorization code and an ID token. We’ll focus on the ID token and I’ll focus on the other part later. Google now is presenting this information to the client and instructing it to pass that information to fancy.io using another redirect.
Authenticating State
Now we’re back at the application a second time, only this time we now have an ID token that identifies the user. This ID Token is in the form of a Base64-encoded JSON Web Token (JWT). It’s effectively a JSON object that contains three parts: (1) a header describing the encryption/signature formatting, (2) a JSON object with user information, and (3) a signature that verifies the legitimacy of the token. The token that the provider (Google in our case) provides would provide this token with user information and a cryptographic signature. This signature verifies that it actually came from Google and wasn’t spoofed. So the process in the OpenID case of verifying the legitimacy of the first authentication involves looking at this JWT and verifying that it did indeed come from the provider you requested.
At this point, you set a cookie on the user’s machine to remember who they are on subsequent requests. This could be a unique identifier tied to their session or even the JWT itself.
Authenticated State
From this point on, we maintain the user’s authenticated state as long as they provide a valid cookie. There are other minutae that we can discuss here like revoking authentication or the case when a user revokes application permissions, but those are topics for another time.
Reauthenticating
There’s one additional state I left out, what happens when the user is no longer authenticated to your app? At this point you now need to redirect the user back to the identity provider to verify who they are. Effectively, you treat reauthenticating as you would a “cold” user.
Why use OpenID?
Having a standard makes the process of authenticating users so much easier. Instead of having to work with a custom log in implementation for each user, you simply have to change small variables like the URL for redirection. It also removes a lot of the “easy to get wrong” details from your application that can cause security vulnerabilities and other bad bugs.